Want to View your Models? You'll want to head to the map!
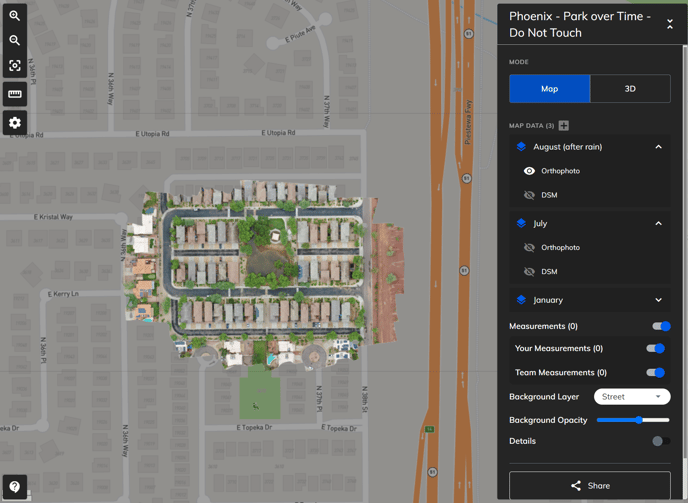
The Mapware Map (Model Viewing)
Once a model has finished processing, it's ready to be viewed in the Map. Here you will interact with the models of a project in order to view the data in 2D or 3D formats. Each model in the project will be collapsible to keep the various layers separate. Additionally there is functionality such as measurements and exporting that is available from this interface.
To access the map:
- Click to open the project where the model is contained.
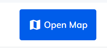
- Click the Open Map button or the name of any of the models within the project.
Map Navigation Tools
![]()
- Zoom In: Clicking this allows the user to zoom in on the displayed data.
- Zoom Out: Clicking this allows the user to zoom out on the displayed data.
- Reset View: Clicking this will return to the default view/extent.
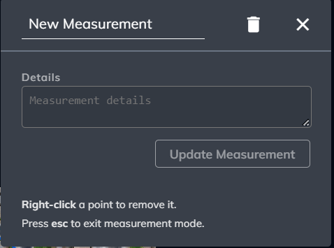
- Measurement Tool: Clicking this will enable the measurement creation tool and bring up the measurement details window. Click anywhere on the map in order to place the begin your measurement. Click as many times as you would like in order to create the ideal polygon measurement. Press ESC at any time to exit the measurement tool. Right clicking a point will remove it. Left clicking a point will allow you to drag and drop to a new location.
- Change Name: The top line on the titlebar, where it says 'New Measurement' is able to be clicked on and edited in order to change the name.
- Details: Type in any details in this text box to be associated with the measurement when it is clicked on.
- Update Measurement: This will save any changes made to the name or details.
- Trash Icon: Clicking this will remove the current measurement.
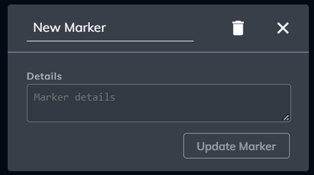
- Marker Tool: Clicking this will enable the marker creation tool and bring up the marker details window. Click anywhere on the map in order to place the marker.
- Change Name: The top line on the titlebar, where it says 'New Marker' is able to be clicked on and edited in order to change the name.
- Details: Type in any details in this text box to be associated with the marker when it is clicked on.
- Update Marker: This will save any changes made to the name or details.
- Trash Icon: Clicking this will remove the current marker.
- Settings: Clicking this will bring up a menu of available options.
- Units: Choose between meters, feet, and inches for the measurement tool.
- Controls: Choose between Earth, Orbit, and First person for how to navigate the data on the screen.
- Show Camera Pivot: This will help you understand how the screen is moving if you have certain controls set. It will also allow you to move the pivot point by clicking the pivot and dragging it to a new location.
- Help: Clicking this will bring up a menu to view a link to the Knowledge Base or to email support if you find a bug or have any questions.
Layer Window
Here you will interact with the individual data layers of the map, in order to activate and deactivate certain features to be viewed.
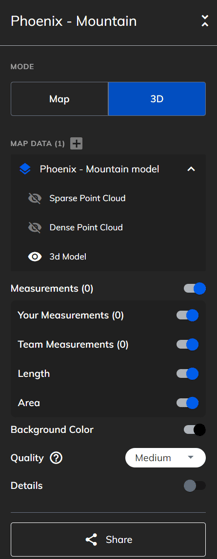
- Mode: Quickly swap between 2D and 3D viewing
- Select Map to view the 2D data layers available in the project. Commonly, the orthomosaic and DSM.
- Select 3D to view the 3D data layers available in the project. Commonly, the dense point clouds and 3D models.
- Measurements: Activate the ability to view measurements, if applicable. Here you are also able to view measurements that other members of your team have made on the map. These are available in both 2D and 3D modes.
- Backgrounds: Use these to set the appearance of the window outside of the data layers included in the project.
- 2D Background Layers: Here you have the ability to select various 2D basemaps in order to use as a reference against your data. Currently you have the ability to swap between Street, Satellite, Terrain, and Dark basemaps. Additionally you have the ability to modify the opacity of that basemap to your liking.
- 3D Background Colors: Toggle this to swap between light or dark background. Depending on the contrast and colors of your 3D data, sometimes a black or light background may be more helpful to see gaps in the model.
- 3D Quality: Toggling this will give you a higher quality 3D model. However, keep in mind this will also increase network and device load, which could affect performance.
- Details: Toggling this will give you more geographic information about how the data was captured
- Image Positions: Toggling this will allow you to view the locations of where the images were captured for the data displayed in the map. These are represented by white polygons and will be accurate to the height of the image capture also.
- Flight Path: Toggling this will allow you to view the flight path of the drone during the image capture. It will also quickly do an animation to show you where the drone started and the route it went on. This will be displayed on the map with a green line and will be accurate to the height of the image capture also.
COMMON PROBLEMS: Occasionally, some browsers will encounter a viewing error when attempting to view the map and 3D model. This article covers some of the most common issues.
Trackpad Navigation Tips
- Click + hold + drag with the second finger allows you to choose a focal point and rotate the model in three dimensions about that point
- Double-tap on trackpad acts as click, so if you double-tap then drag it acts the same way
- Two-finger drag allows you to zoom in and out
- Right click + hold allows you to move your position relative to the model without rotation
- Left click + hold allows you to move the camera around
- Two-finger pinch zooms out
- Two fingers spread zooms in
Mouse and Keyboard Navigation Tips
- To zoom in and out, use your mouse's scroll wheel
- To rotate the model in three dimensions, hold left click and move your mouse
- To move your position relative to the model without rotation hold Right-click and move your mouse.
- If you turn on "Dense Point Cloud" or "Sparse Point Cloud" you can double-click on a point to quickly zoom in to where you have clicked.