A user guide that helps you quickly understand Mapware Fly and fly a drone with it!
Welcome!
Congratulations on downloading Mapware Fly! (psst! download the Android App here if you haven't already)
You’ll use this app to automate aerial photogrammetry flight planning, flight control, and image capture missions with your drone.
Once you’ve flown over a site and collected a set of images, you can upload them to Mapware’s photogrammetry software-as-a service (SaaS) or to any third-party photogrammetry tool and transform them into 3D digital twins and other useful file formats.
Last Updated 8/24/22 for Mapware Fly v1.5.1
Table of Contents
This guide is broken up into the following sections. We recommend you follow them in order instead of jumping straight to the tutorial part:
- Gathering Your Hardware describes the gear you need to run Mapware Fly.
- Setting Up Your Account explains how Mapware accounts work and helps you set one up.
- File Management Basics explains how you will organize your work in Mapware Fly.
- Step-by-Step Guide to Your First Flight walks you through a basic, low-risk Mapware Fly mission to get you started.
- Picking A Spot
- Connecting Your Drone
- Logging In
- Creating a Project
- Creating A Mission
- Finding Your Location on the Map
- Checking Restricted Airspace
- Toggling Satellite View
- Selecting an Area of Interest
- Selecting Measurement Units
- Adjust Camera Settings
- Mission Types
- Setting Flight Parameters
- Completing Preflight Checklist
- In-Flight Interface
- Mission Completion
- Download Mission Images from the Drone
- View Mission Image
- Upload Images to Mapware
- Process a Photogrammetric Model in Mapware
Gathering Your Hardware
Overview
To use Mapware Fly, you need the following equipment:
- a camera drone for capturing aerial images
- a tablet to run the Mapware Fly app
- a USB cord to physically connect the tablet to the drone controller
When you open Mapware Fly on your tablet, you connect it via USB to your drone controller to access the drone’s flight navigation software. This is how Mapware Fly can monitor your drone’s position and display FAA airspace restrictions on the map.
Compatible devices are listed below. These tables are not comprehensive, but we will make every effort to keep them updated as we approve new devices.
Tablets
Table 1 lists tablets that we have confirmed to work with Mapware Fly.
NOTE: You are welcome to use tablet models that are not listed below, but you may experience performance issues with tablet display sizes much larger or smaller than 10.1”.
Table 1: Compatible Tablets
|
Model |
Manufacturer Link |
|
Samsung Galaxy Tab A7 |
|
|
Samsung Galaxy Tab A7 Lite |
|
|
Samsung Galaxy Tab A8 |
|
|
Samsung Galaxy Tab S7 |
|
| Samsung Galaxy Tab S8 |
Smartphones
Mapware Fly is not yet recommended for use with smartphones. If you would like to use Mapware Fly on your smartphone, please email us at support@mapware.com so we are aware!
Table 2: Compatible Smartphones
|
Model |
Manufacturer Link |
|
N/A |
N/A |
Drones
WARNING: Do not use Mapware Fly with any drone models not listed below. We cannot guarantee the safe performance of a given drone model until our quality assurance team has tested it rigorously.
Table 3: Compatible Drones
|
Model |
Manufacturer Link |
|
DJI Mavic 2 Pro |
(Discontinued by manufacturer) |
|
DJI Phantom 4 Pro V2.0 (non RTK) |
|
|
DJI Mini 2 |
|
|
DJI Mavic Air 2 |
|
|
DJI Air 2s (starting with Fly v1.5.2) |
TIP: Please make sure that you have an SD card inserted in the drone, or you will not be able to capture data.
Setting Up Your Account
Here, we describe how Mapware user accounts work and how you can register for one.
NOTE: Every Mapware account is a Mapware Fly account.
If you’ve registered for Mapware online through a browser, you can use that same account to access the flight app. If not, you can register for a new account — and it will work for both Mapware and Mapware Fly.
Registering for a New Account
There are two ways to register for a new Mapware account depending on whether you use Gmail or another type of email account. Both methods require a cellular or Wi-Fi signal to access Mapware’s cloud servers.
Signing Up with Gmail
To sign up with a Gmail account:
- On your mobile device, open the Mapware Fly app.
- On the Mapware Fly login screen, tap New to Mapware? Create a free account.
- In Mapware - when you see the register browser tab, tap Sign up with Google.
- In the sign in screen – when the Google Accounts browser tab opens, tap one of your existing Gmail accounts.
- In Mapware – on the register browser tab, tap the checkbox I agree to the Terms of Service, Privacy Policy, and Cookie Policy.
- Tap Create account.
- Mapware will send a verification email to the address you provided. Click the link to activate your account.
At this point, you are signed into Mapware Fly and brought to the Projects screen.
Signing Up with a Non-Gmail Account
To sign up with a non-Gmail account:
- On your mobile device, open the Mapware Fly app.
- On the Mapware Fly login screen, tap New to Mapware? Create a free account.
- In Mapware: in the register browser tab that opens, enter your First name, Last name, and Email address.
- Enter a Password for your Mapware account. This does not have to be the same password you use to log in to your email.
- In Mapware: in the register browser tab, tap the checkbox I agree to the Terms of Service, Privacy Policy, and Cookie Policy.
- Tap Create account.
- Mapware will send a verification email to the address you provided. Click the link to activate your account.
At this point, you are signed into Mapware Fly and are brought to the Projects screen.
File Management Basics
Here is a quick description of how you manage files and data in Mapware Fly. In short, you plan and execute Missions, store them in Projects, and restrict access using Teams.
Missions
A Mission is a flight plan over a specific area of the map, with your instructions for how your drone and camera should behave. You can plan a Mission in advance, and then store it in one of your Projects for retrieval when you reach the worksite. The mission card is a piece of the UI that shows you information about the Mission and allows you to tap on it to enter the project. A thumbnail is shown with a snapshot of the AOI for each mission to help you distinguish between missions. If you press the ellipses you will be given more options for interacting with the mission.
- Open will bring the user to the Mission Details page, which allows the user to view any images that have been captured (if the mission has been run previously), or press View Flight Plan to enter the map. NOTE: You can alternatively press anywhere on the mission card to enter the Mission Details page.
- Rename allows you to change the name of the mission.
- Duplicate allows you to create a second mission in the same project, which will copy the exact same flight path and parameters from the mission selected. This is helpful if you would like to do change detection and fly the same area at a different time, and then examine the differences. NOTE: Images are not duplicated to the new mission and will remain with the original mission.
- Move will give the user an option to change the project which the mission is assigned to.
- Delete will permanently delete the mission.

Projects
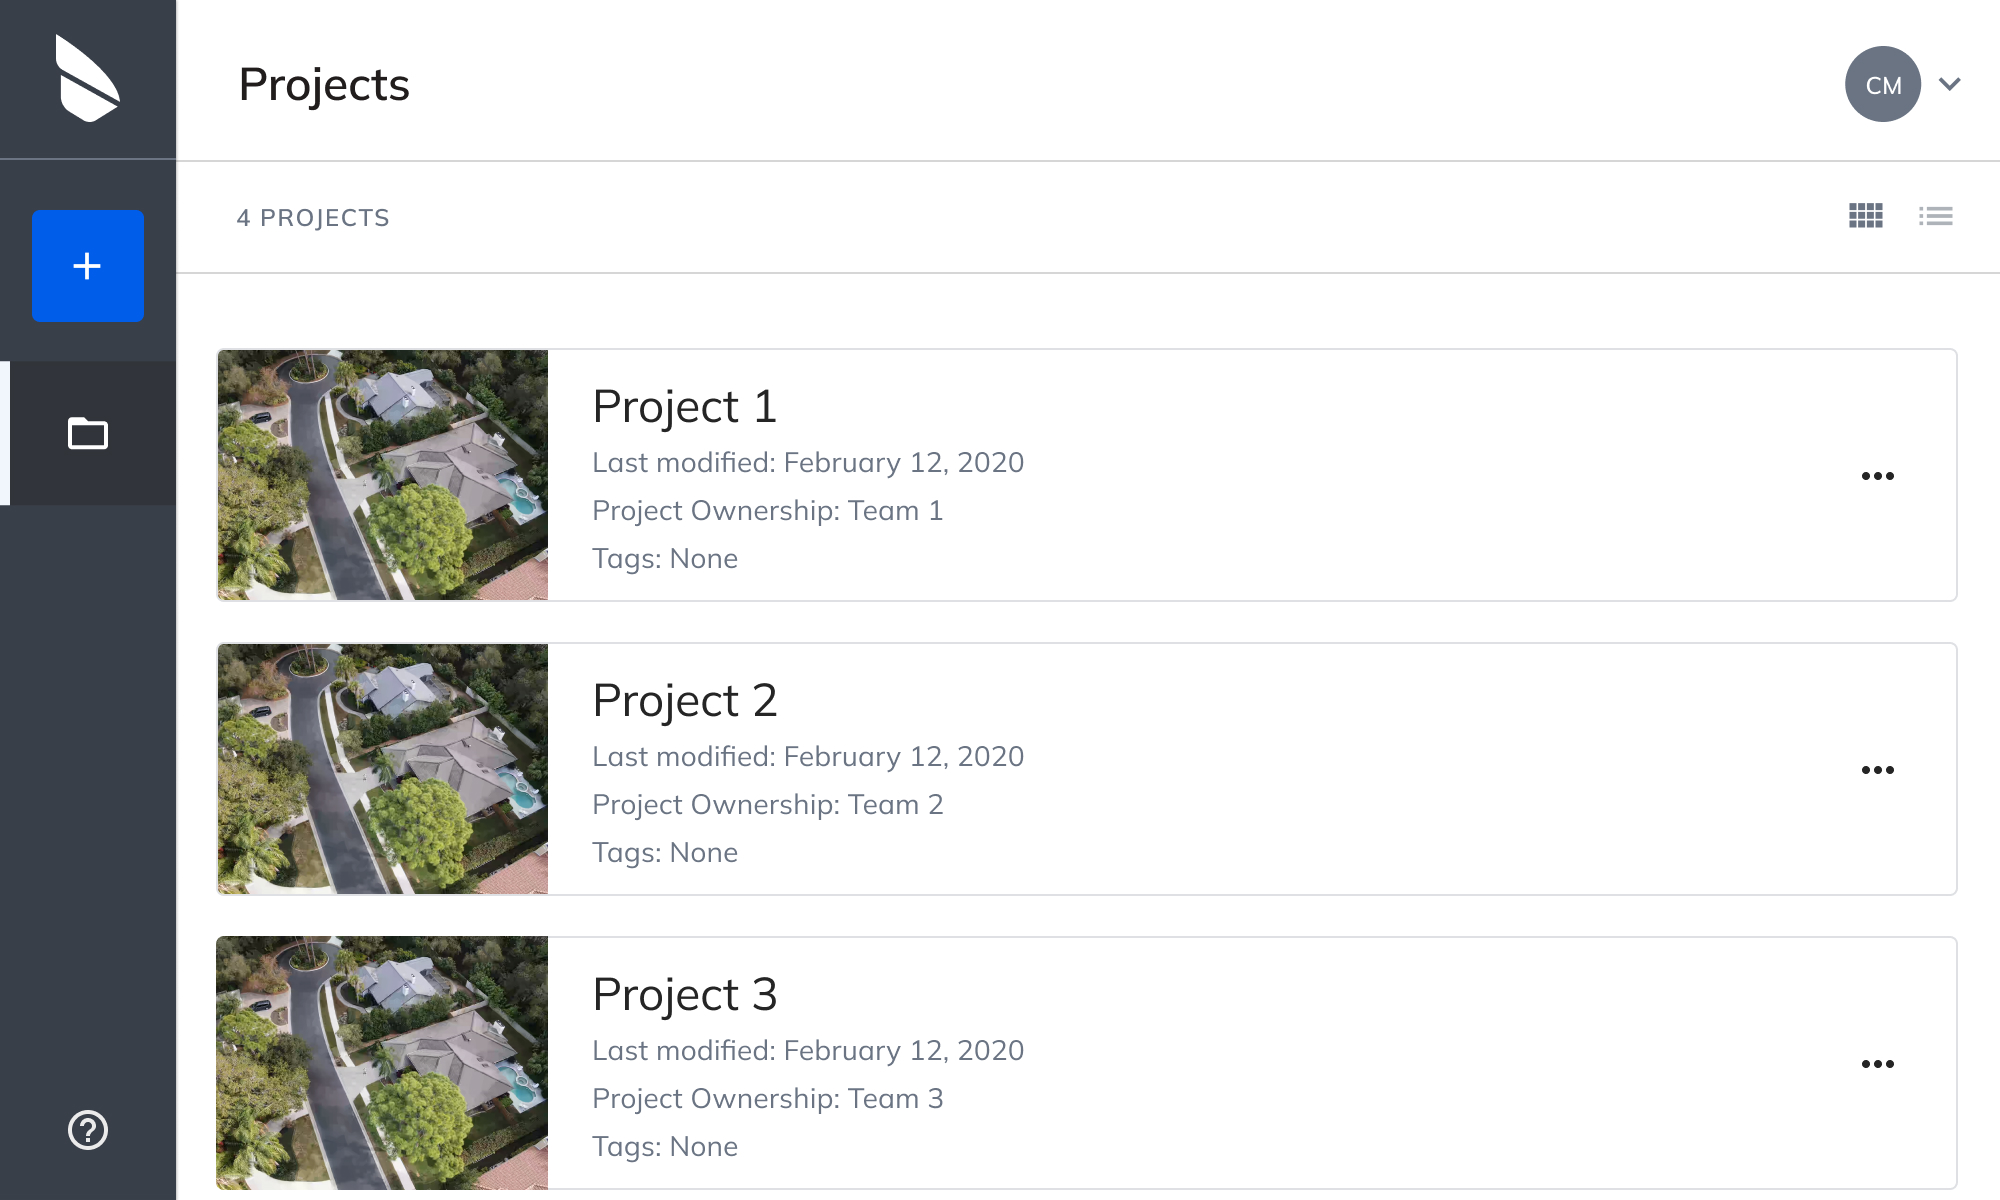
A Project is a container for Missions. It may represent an assignment you’ve received from a client, or a worksite where you are conducting several unrelated Missions. You can store as many Missions as you want in a Project, and you can assign Teams to restrict who has access to view the contents of the Project. The project card is a piece of the UI that shows you information about the mission and allows you to tap on it to enter the project. A thumbnail is shown with either a snapshot of a mission AOI or completed model from Mapware, to help you distinguish between projects. The thumbnail will always show an image from the most recently run mission.
If you press the ellipses you will be given more options for interacting with the mission.
- Open will show the Mission list and allow the user to see the missions that are contained within the project. NOTE: You can alternatively press anywhere on the project card to show the Mission list.
- Rename allows you to change the name of the project.
- Delete will permanently delete the project.

Teams
A Team is a list of Mapware users who share a Mapware subscription plan and have access to one or more Projects. When you create a new Project in Mapware Fly, you assign it a Team. Each member of that team can then access the contents of the Project.
NOTE: To create a new Team, you must log into the Mapware photogrammetry SaaS. Mapware Fly only lets you assign existing Teams to a Project. Also, Teams in the Mapware SaaS can assign granular permission levels (like view, edit, and admin). But in Mapware Fly, a Team either has access to a Project, or it does not.
Tutorial: Taking Your First Flight
If you want to get started right away with Mapware Fly, this section will walk you through conducting a basic test-Mission.
Picking a Spot
Pack up your drone, controller, tablet, and USB cord. Travel to a location where you can fly safely. Ensure the terrain is level and relatively free of tall trees and vertical structures. For now, just pick something like an empty sports field.
Connecting your Drone
For the most part, connection with your drone is not needed until you are ready to fly. However, you are able to connect the drone at any time while using the application if you wish. If a drone is connected, the connection status will be displayed in the upper right hand corner of the screen. 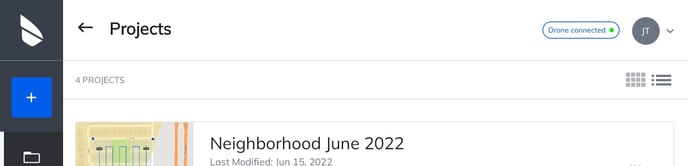
NOTE: Certain functionality will ONLY work with a drone connected, such as seeing restricted airspace on the map and previewing the preflight checklist.
- When you are ready to connect your drone, turn on:
- your drone
- your controller
- Using the USB cord, connect your drone controller to the tablet.
- When your tablet prompts you to “Choose an app for the USB device”, tap the Mapware Fly icon and Just once.
Table of ContentsNOTE: Do not choose DJI Fly or any other drone flight control software. Doing so will override Mapware Fly’s connection to your drone and prevent you from taking off.
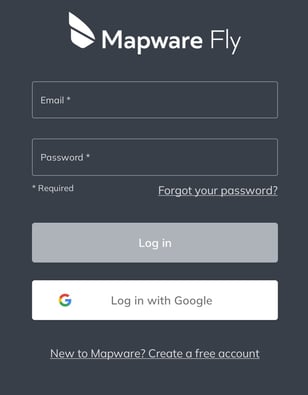
Logging In
- If you haven’t used Mapware before, follow the instructions in Registering for a New Account.
- On your tablet, tap the Mapware Fly icon to open the app.
- Enter your Mapware account credentials to log in.
This takes you to the Projects screen. 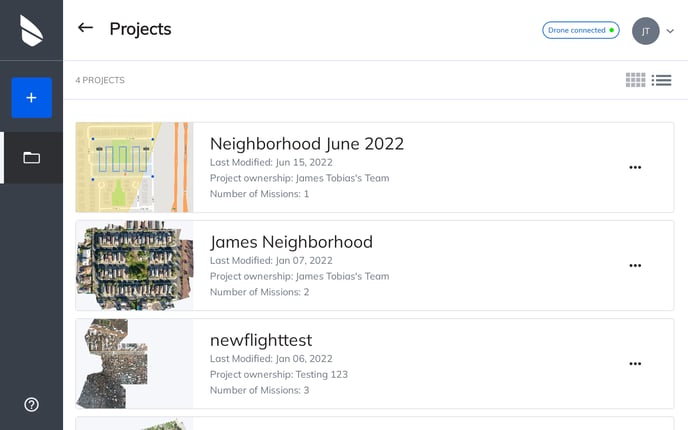
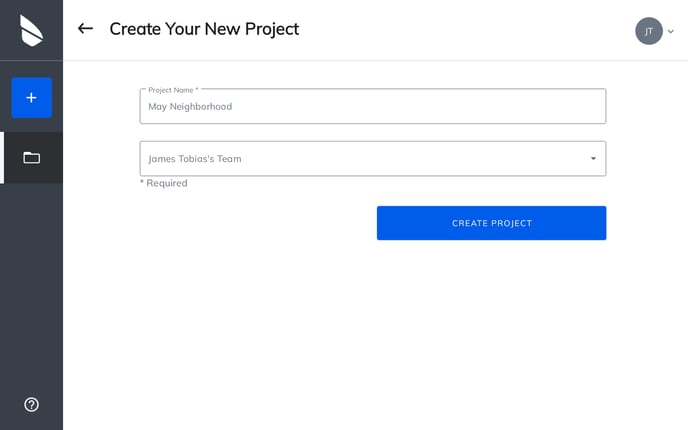
Creating a Project
To create a new Project:
- On the left side of the Projects screen, tap the blue plus (+) icon.
- On the Create Your New Project screen, give your Project a unique name.
- Using the dropdown menu, grant one of your Teams access to the Project.
- Tap Create Project.
NOTE: You can only assign a Project to a Team that you are a member of. If you are only a member of one Team, it is selected by default.
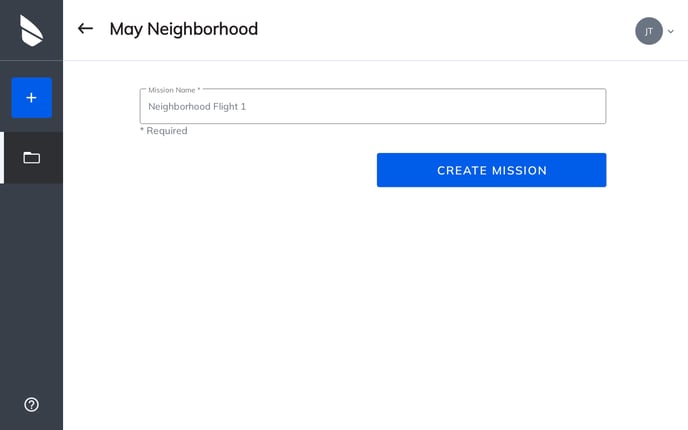
Creating a Mission
To create a new Mission:
- If you just created a new Project, you should have it open already. Otherwise, tap one of your existing Projects to open it.
- On the Project [name] screen, tap Create First Mission.
- Give your mission a unique name and tap Create Mission.
- Click OK to close the “Quick Start” message, since we are walking you through this process.
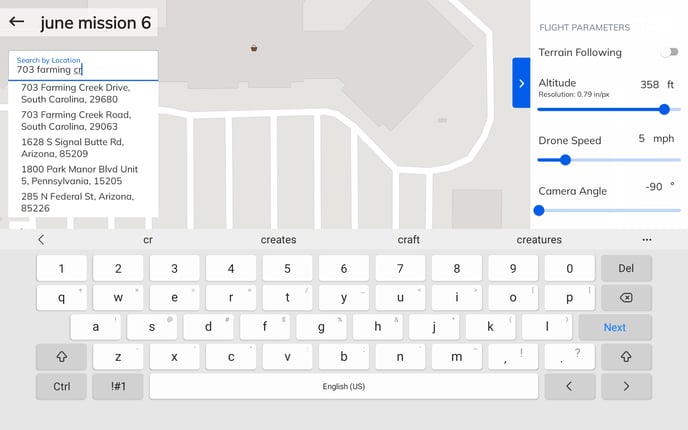
Finding your location on the Map
You can navigate the map screen in the following ways:
- Zooming: Place two fingers together on the screen and drag them slowly apart to zoom in. Reverse this action to zoom out.
- Panning: Place one finger on the screen and drag it up, down, left, or right to move the map in that direction.
- Rotating: Place two fingers about one inch apart on the screen and rotate them together to rotate the map in that direction.
- Search by Location: Press the magnifying glass icon in the upper left hand corner to activate a search bar. Here you can search by zip code, address, POI (Point of Interest), and much more! Once you have typed in a location, press the location from the list that most fits what you are looking for, and then the map will pan and zoom to that location.
- Zoom-To-Me: Press the second icon in the upper left hand corner in order to pan and zoom to your devices location at any time.
When you have zoomed in close enough to see your location’s individual streets or other landmarks, read on.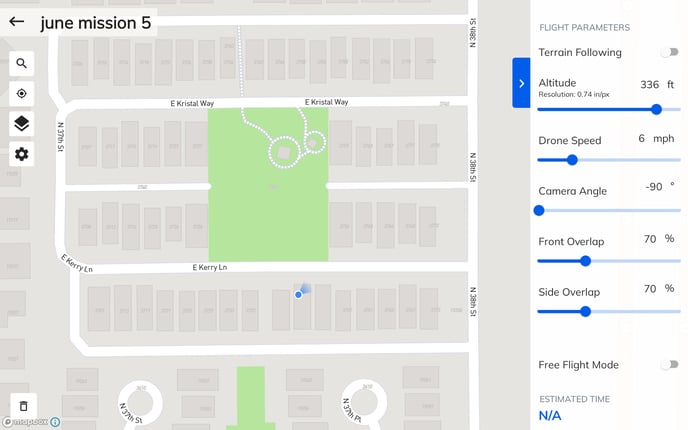
Checking Restricted Airspace
Before you continue, now is a good time to ensure that your drone is legally allowed to take off in its airspace. You should not see any restricted airspace overlying your intended location.
Mapware Fly can harness DJI’s software onboard the drone to display the same airspace restrictions that you would see in another app like DJI Fly. This lets you see areas that are illegal for your drone to fly in without having to consult another app.
NOTE: Most DJI drones will not take off in an area encompassed by a flight restriction.
If you don’t see any active flight restrictions at all, verify that your drone, controller, and tablet are on and connected as described in ‘Connecting your Drone’. You may have to power everything down and repeat that section. Verify the connection status shows in the upper right hand corner of the screen.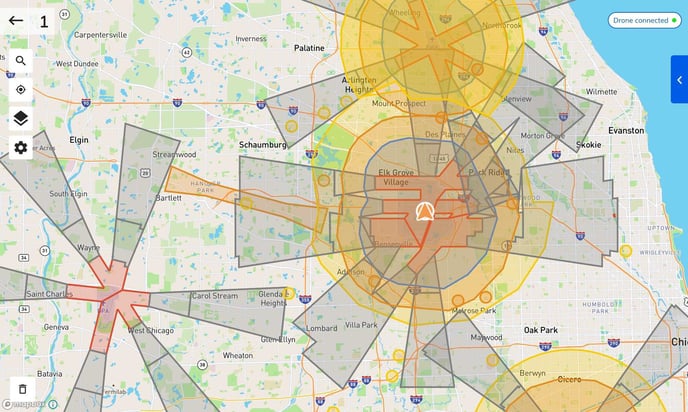
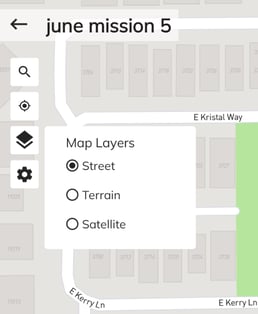
Toggling Satellite View
By default, the map screen displays a Street View like what you see in Google Maps. But it’s best to see an accurate satellite picture of your location to ensure you plan your flight over the right spots. Here’s how to toggle Satellite View:
- On the left side of the map screen, tap the Map Layers icon (the third one down, depicting two overlapping squares).
- In the Map Layers menu, select Satellite.
- Click the Map Layers icon again to close the menu.
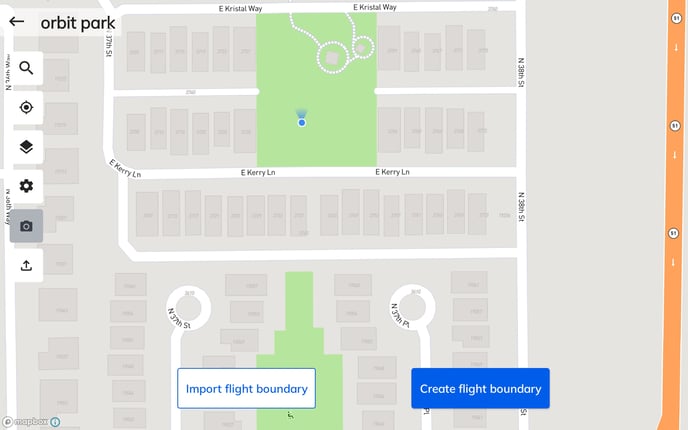
Selecting an Area of Interest
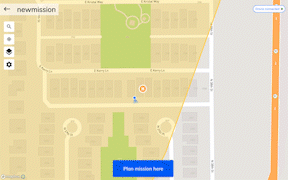
Now that you’ve zoomed in to a satellite view of your location, you can select the Area of Interest that you want your drone to fly over taking pictures. Mapware Fly then calculates an optimal flight path for your drone to cover the Area of Interest.
Here is how to create a simple square Area of Interest:
NOTE: You also have the option to Import a flight boundary via a shapefile or .kml by using the import flight boundary button. Make sure if you use a shapefile that all of the necessary files are included in a singular zip file before attempting to upload. Either the shapefile or .kml should be a polygon of the area of interest, and then you can adapt the flight path using the parameters.
- Press the 'Plan mission here' button
Mapware Fly now has enough information to construct a flight plan. You’ll see the polygon filled in with a zigzagging line representing the drone’s flight path, and labels for the Start and End points. Mapware Fly will automatically take the right number of photos in the right spots to completely capture your Area of Interest. You can see the image locations for the flight represented by white circles on the flight path.

You can create any polygon shape, but we recommend a triangle, rectangle, or square for the best flight path. To modify the polygon, you can drag any of the blue vertices by pressing and dragging to the desired location. To create additional vertices, you can tap any of the white (transparent) vertices to create a modifiable blue vertex. To delete vertices, you can long press a blue vertex and an option will appear to delete.
To move the polygon to a new location, tap and drag the move icon in the middle of the polygon.
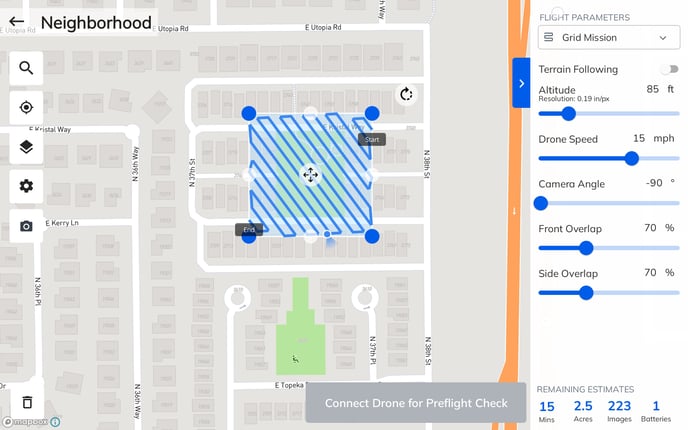
To rotate the flight path inside of the polygon, press and drag the rotate icon above the polygon to either the left or right to get the desired rotation. Imagine that there is a line above the area of interest that represents -180 degrees -> 0 degrees -> 180 degrees. For example, dragging all the way left results in a -180 degree rotation and all the way to the right is 180 degree rotation. The rotate icon will remain in the location you dragged it in to represent the amount of rotation the flight path currently has. If you drag the rotate icon close to the center (0), it should snap to revert back to the default rotation.
Tap either the word Start or End in order to flip where the drone starts or ends the flight.
Table of ContentsSelecting Measurement Units
Mapware Fly calculates all measurements in either imperial or metric units. You can tap the gear icon on the left side of the map screen to open the Units menu and switch between Imperial and Metric. This setting will be maintained in the application if you go to a different mission or logout. Tap the gear icon again to close the menu.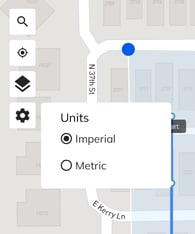
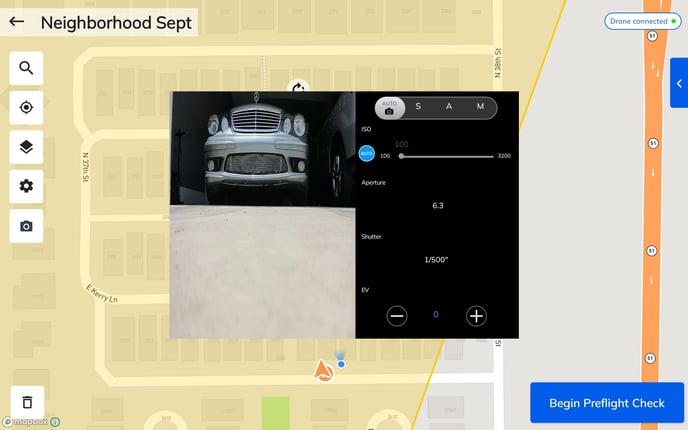
Adjust Camera Settings
Mapware Fly allows you to adjust specific camera settings such as exposure and iso. These settings will be saved to the drone, so make sure to reset the camera to automatic if you do not plan to keep these settings long term.
The exact settings available to be changed will depend on the type of drone connected to the application. But, you should expect to be able to change any of the settings you would see in the DJI app. This could include, but not limited to, Auto/Manual, ISO, Aperature, Shutter Speed, EV, and more. It's recommended to leave these settings in Auto unless you are an advanced user and understand the impact these settings can have on the image quality.
Note: In order to use this functionality, the drone controller must be connected to the tablet and both the drone and controller must be turned on.
Note 2: This feature is only available BEFORE a flight has begun, so make sure to make your camera adjustments prior to taking off.
Mission Types
Mapware Fly allows you to create flight plans with a variety of different mission types in order to capture the optimal images for your goals.
- Grid Mission: This is the default mission type and is ideal for quick and accurate image capture. This mission type would be recommended for generating quick 2D maps or capturing large and flat terrain (such as a field). Generally -90 degree or NADIR camera angle is ideal for this mission type.
- Double Grid Mission: Sometimes known as a crosshatch pattern, this is ideal for optimal 3D model creation. Capturing areas in 2 different directions will enhance the vertical details captured in order to generate improved point clouds and meshes for 3D models. Keep in mind that this mission type will take significantly longer and capture double the images of a normal grid mission.
- Corridor Mission: Ideal for linear areas to be captured, such as utilities (such as pipelines, powerlines, canals, etc). This mission type allows a similar image capture to a grid mission however captures back and forth specifically to linear (long and narrow) shapes with bends. This mission type has an additional parameter to adjust the corridor width, allowing you to modify how wide you want the corridor to be captured.
- Orbit Mission: This is an advanced mission type for users looking to focus on a specific object, building, or landscape. An orbit will allow you to capture a number of images specific to that location and can be a great addition to fly after a normal grid mission to improve 3D models. This mission type has an additional parameter which allows the configuration of the overlap using the angle between images. Setting a closer angle will have more overlap and capture more images than setting the angle wider.
- Free Flight Mission: The least used mission type allows more flexibility to you in order to capture areas exactly to your liking. Both the flight path of the drone and the images captured, are manually controlled via the drone controller by you. This mission type has an additional parameter for turning on automatic image capture. When this feature is activated, the camera will automatically take pictures to the configured distance or time set in the parameters window. This is designed so the pilot can focus on flying the route and know images will be automatically captured at set intervals. Note: When you select this mission type, it will remove any previously created area of interest on the map.
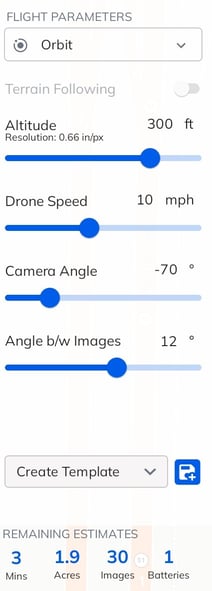
Setting Flight Parameters
Now that you’ve designated an Area of Interest, it’s time to review parameters for how your drone will conduct the image capture flight. Mapware Fly automatically calculates optimal values for most of these parameters, so you will probably only need to adjust the Terrain Following, Altitude, and Camera Angle.
Here are the parameters:
- Mission Type: Select one of the mission types from the dropdown list to see a specific list of parameters for that flight mode. To learn more about mission types, see above.
- Terrain Following: Turn this on to ensure that the drone always maintains its preset altitude above the ground despite changes in terrain elevation. Leave it off to ensure that the drone ascends to its preset altitude at the start of a Mission and retains a straight flight path despite changing elevation. We recommend always turning it on. Doing so can improve the quality of your images and prevent you from exceeding the FAA’s maximum altitude limit when you fly over a dip in the terrain.
- Corridor Width: Applicable only to the corridor mission type. This allows you to modify how wide you want to capture images inside the corridor area. It's defined as a buffer of the radius distance from the midpoint of the corridor segment.
- Altitude: Set this to whatever altitude above ground level (AGL) you want the drone to climb to at the start of a Mission. Set this parameter carefully to ensure your drone stays above vertical structures. The drone will stay at this altitude throughout its flight. Note that the drone’s actual height above the ground will change many times during the Mission if you leave Terrain Following off. Ground sampling distance resolution is also displayed and will update when altitude is adjusted.
- Airspeed: Set this to whatever speed in miles per hour (mph) you want the drone to maintain during its flight. We recommend 10mph for Mavic 2 Pro and Phantom 4 and 4mph for Mini 2 and Air 2. This will ensure all images are captured at the appropriate location.
- Camera Angle: Set this to whatever angle you want the camera to take pictures from. By default, this parameter is set to -90 degrees (straight down).
- Front Overlap and Side Overlap: These settings determine the amount of overlap between the photos your drone will take. By default, they are both set to 70%. This is the optimal setting for most Missions.
- Angle b/w Images: Applicable only to the orbit mission type. This allows you to configure the overlap between photos your drone will take, specific to the orbit flight. Setting this to a higher number of degrees will capture less photos and be a quicker flight because there is a bigger gap between each photo. And vice versa, if you want a higher quality capture with more images, set to a lower number of degrees.
- Remaining Estimates: You cannot set this parameter directly. Mapware Fly automatically calculates the amount of time it will take your drone to complete the flight, how much area will be covered, how many images will be captured, and the approximate number of batteries. NOTE: The number of batteries is a conservative estimate assuming good battery health and charge.
To set Flight Parameters:
- If the Flight Parameters menu is not visible on the right side of the map screen, tap the blue arrow (<) to display the menu.
- Toggle on Terrain Following.
- Adjust the Altitude slider to ensure clearance with trees and other vertical structures at your site.
- Set an appropriate Speed for the drone type.
- Adjust Overlap and Camera Angle, if appropriate, for the goals of your mission.

If there are specific parameters you like to use for different types of missions, you can now save those settings in templates. To create a parameter template:
- Set the parameters to what you desire
- Press the save icon next to the dropdown which says 'Create Template'
- Type in a name for the template
- Press Save
Now you can reuse that template anytime you return to Mapware Fly to fly a new mission by selecting the template name from the dropdown.
To overwrite a parameter template:
- Select the template name from the dropdown at the bottom of the parameter window
- Make adjustments to the parameters to what you desire
- Press the save icon next to the dropdown which says your template name
- Press Save
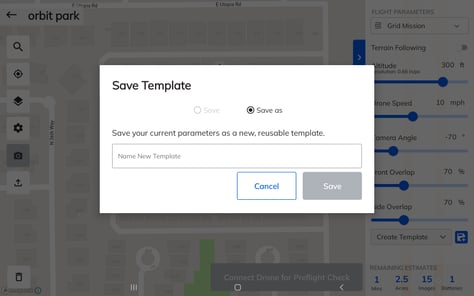
To delete a parameter template:
- Select the template name from the dropdown at the bottom of the parameter window
- Press the save icon next to the dropdown which says your template name
- Press Delete
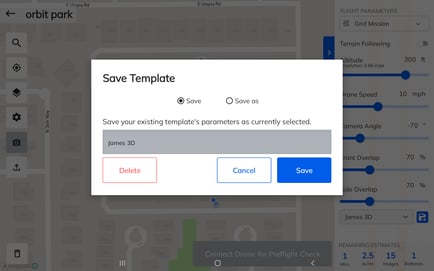
NOTE: Each mission type has a unique list of templates. So if you save a template for a grid mission type, it will not be available for the other mission types. This is because each mission type has it's own set of parameters that are available.
Completing Preflight Checklist
With your Area of Interest selected and your Flight Parameters set, you are ready to start the Mission.
- On the bottom of the map screen, tap Begin Preflight Checklist. The checklist will dynamically check whether the drone is connected and if the battery is greater than 30%.
- If the drone is not connected, please connect the drone directly to the tablet now. If prompted, click to use Mapware Fly with the device.
- Once all the preflight checklist options have a blue checkmark, the Mission is ready to begin. Press the Take Off button to begin the Mission.
.jpg?width=688&name=Screenshot_20220615-104411_Mapware%20Fly%20(1).jpg)
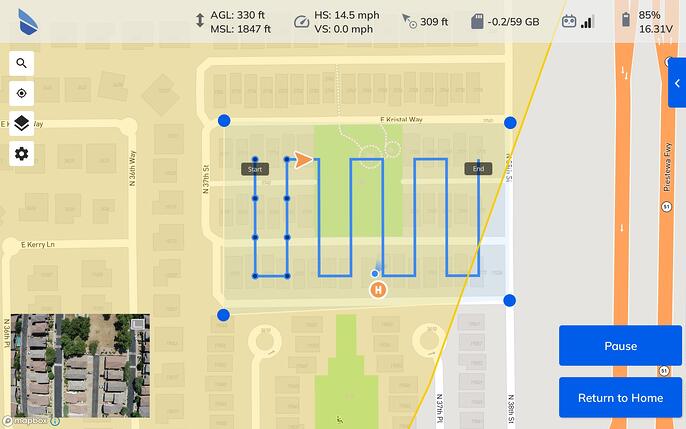
In-Flight Interface
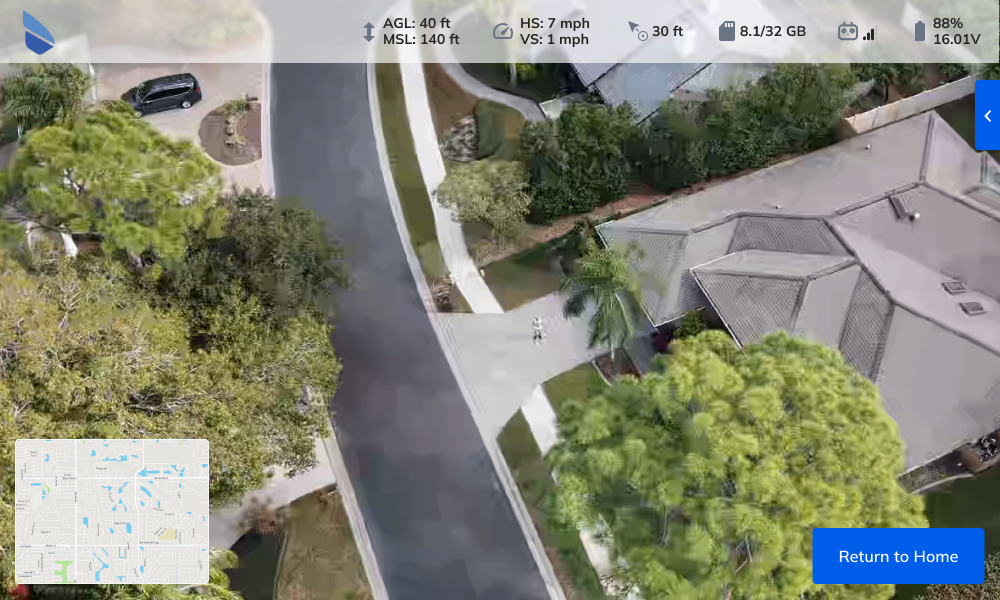
Once the Mission has begun, the interface will change to our inflight map. You’ll notice the interface is like Mission Planning, however, has adapted parts of the screen for more useful data during a flight. Here is more detail:
- On the bottom left-hand side of the screen, you’ll see there is a Picture-in-Picture with a livestream of video from the drone.
-
- If you would like to swap the video to take over most of the screen, press anywhere inside the picture-in-picture and it will swap the main view. You can swap back by pressing the minimap at any time.
- The top of the screen will now display the Flight Telemetry bar.
-
- Flight Altitude is displayed in both AGL (Above Ground Level) altitude and MSL (Mean Sea Level) altitude. These are both displaying the altitude of the drone, not the home location. NOTE: If the drone is flown while in offline mode, the user will only see an altitude value that represents the height above the home location.
- Speed is displayed with two values, HS for Horizontal Speed and VS for Vertical Speed.
-
- Distance from Home is displayed to the user to show how far the drone is from the original take-off location.
- SD Card Storage is shown with a number of how many GB of data are used out of the total amount of storage on the device. (ie: 6/24)
- Controller Signal Strength is displayed with how well the controller has connectivity with the drone. If signal strength is low, we recommend NOT to continue the Mission, as it may interfere with drone accuracy and safety. If the signal strength gets low enough, the application will automatically warn you.
- Drone Battery Life is displayed as the last value on the telemetry bar.
- The Flight Parameters window is set to dock to the right-hand side of the screen by default but can be undocked by pressing the blue arrow at any time to view the parameters the Mission was configured for. Note: These values are greyed out and unable to be edited during the flight.
- Drone Location is displayed on the map with an orange arrow. This icon will move as the drone progresses through the Mission.
- Image Locations will be displayed on the map with black dots along the flight path, where images have been captured by the drone.
- Tablet Location (aka You are Here) is displayed on the map with a blue dot and a radial shadow which displays the direction the tablet is pointing.
- Pause allows you to immediately stop the drone at any time. Additionally, once the drone is paused, you can take control of the drone using the controller to make any maneuvers you would like. Once you are ready to continue the Mission, press the Resume button and the drone will return to the original Mission.
- Return to Home will stop the Mission and return the drone to the home location. Note: You’ll be prompted to confirm before the drone will stop and return home.
Mission Completion
Once the drone has landed, the Mission will be complete. You may receive two different options here, depending on how the flight proceeded:
- Mission Success: If the entirety of the Mission was fully along the planned flight path, you will receive this message.
- Mission Incomplete: If you sent the drone to return home or if there was an issue encountered during the flight, you will receive this message. Additionally, the application will prompt you with two options of how to proceed.
- Resume will cause the drone to take off and complete the Mission where it left off. For long Missions where multiple batteries may be required, you can replace the battery in this step and then send the drone to complete the rest of the Mission.
- End Mission will complete the Mission as-is.
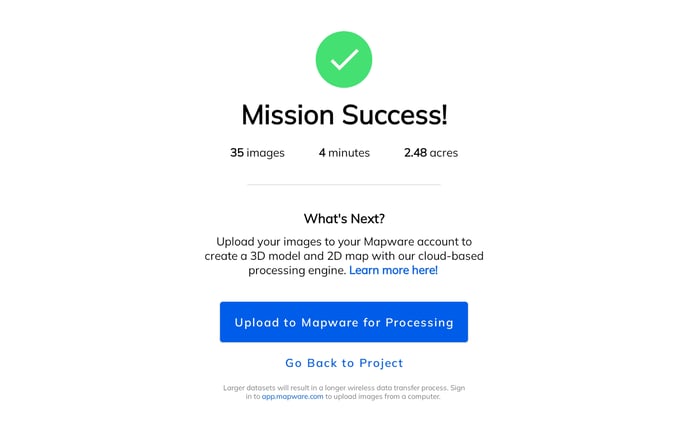
Download Mission Images from the Drone
The mission success page gives the option to Go Back to Project if you want to manually upload your images to your computer later. It is not required to download or upload images if you prefer a manual process.
However, if you press Upload to Mapware for Processing, the software will begin downloading images automatically from the drone to the tablet once the Mission Details page appears. Please do NOT turn off the drone or disconnect the controller during this step. If you do lose connectivity with the drone, such as if the battery dies, reestablish connectivity and the application should allow you to begin downloading images again. Note: Downloading the images to the tablet does NOT remove the images from the drone's SD card.
- Pause Download will allow you to pause the download from the drone to the tablet at any time. If you pause temporarily and would like to continue downloading, press the Resume Download button.
- View Flight Plan will allow you to go back to the Mission planning step and review the map, or even flight another Mission. We recommend to fully complete downloading the images before beginning another Mission.
- Download Progress will show in the upper left-hand corner, showing a blue progress bar across the screen, as well as the number of how many images have successfully downloaded and the total number of images taken during the Mission. (ie: 10/503)
.jpg?width=688&name=Screenshot_20220615-104954_Mapware%20Fly%20(1).jpg)
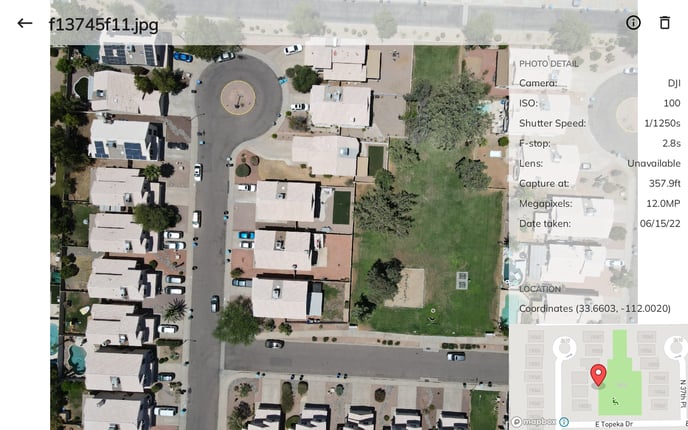
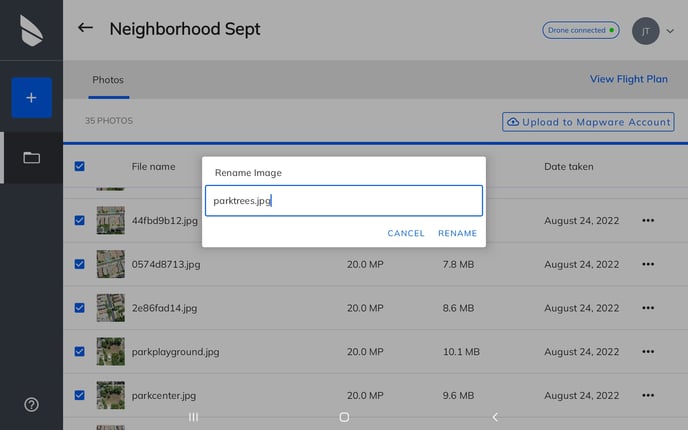
View Mission Images
On the Mission Details page, you will always see a list of images from the Mission once they have downloaded from the drone. At any time, you can press the ellipses (…) to see additional options for the images.
- Open will display the image in full screen and provide additional information such as Camera type, ISO, Shutter Speed, and more. These images will display in low resolution if they have already been uploaded to Mapware. Once open, press the i icon in order to see more information about the image.
- Delete will allow you to delete any images that may have been taken on accident or are poor quality.
- Rename will allow you to rename any images that you would like to give specific names to.
NOTE: This will only delete the image from the tablet, and not the drone’s SD card.
Upload images to Mapware
Once the download has completed, you then have the option to upload the images to Mapware’s servers to be used in photogrammetric model processing. Note: If you wish, the drone can be powered off and the controller disconnected during this step.
- Upload to My Mapware Account will begin the upload to Mapware’s cloud storage. At any time, the user can press Pause Upload to stop the upload progress and Resume Upload to continue.
- Each individual image row will contain an Up Arrow Icon next to the ellipses once it has successfully uploaded to your Mapware account.
Note: Once images are uploaded to Mapware, the images retained on the device are only low resolution. This is done to save device storage for future missions. In order to view high resolution images, you'll need to visit your account on Mapware.
.jpg?width=688&name=Screenshot_20220615-105222_Mapware%20Fly%20(1).jpg)
Process a Photogrammetric Model in Mapware
For a complete step by step guide to using Mapware, please see the knowledge base article: Mapware Quick Start Guide.
When the upload has completed, you can then press Process Model in Mapware to open a browser to app.mapware.com. This is the main Mapware application, where you can create a new model using the images that were just uploaded.
.jpg?width=688&name=completed%20model%20in%20mapware%20(2).jpg)