Check here to learn more on how to set your parameters for the best image quality for your goals.
Parameter Definitions
Just as a reminder, here is a full list of parameters available in the application and what they mean.
- Mission Type: Select one of the mission types from the dropdown list to see a specific list of parameters for that flight mode. To learn more about mission types, see here.
- Terrain Following: Turn this on to ensure that the drone always maintains its preset altitude above the ground despite changes in terrain elevation. Leave it off to ensure that the drone ascends to its preset altitude at the start of a Mission and retains a straight flight path despite changing elevation. We recommend always turning it on. Doing so can improve the quality of your images and prevent you from exceeding the FAA’s maximum altitude limit when you fly over a dip in the terrain. To learn more about terrain following, see here.
- Corridor Width: Applicable only to the corridor mission type. This allows you to modify how wide you want to capture images inside the corridor area. It's defined as a buffer of the radius distance from the midpoint of the corridor segment.
- Altitude: Set this to whatever altitude above ground level (AGL) you want the drone to climb to at the start of a Mission. Set this parameter carefully to ensure your drone stays above vertical structures. The drone will stay at this altitude throughout its flight. Note that the drone’s actual height above the ground will change many times during the Mission if you leave Terrain Following off. Ground sampling distance resolution is also displayed and will update when altitude is adjusted during planning..
- Airspeed: Set this to whatever speed in miles per hour (mph) or meters per second (m/s) you want the drone to maintain during its flight. We recommend a maximum of 10mph for Mavic 2 Pro and Phantom 4 and 4mph for Mini 2 and Air 2. This will ensure all images are captured at the appropriate location even in less than ideal conditions.
- Camera Angle: Set this to whatever angle you want the camera to take pictures from. By default, this parameter is set to NADIR or -90 degrees (straight down).
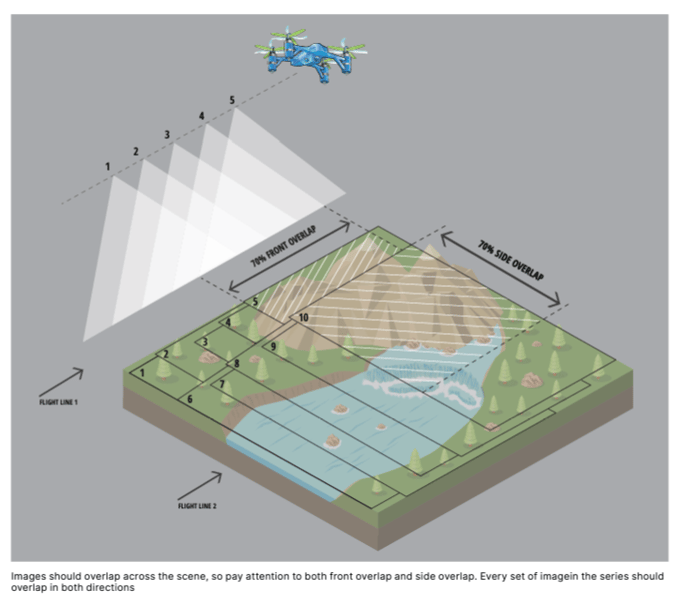
- Front Overlap and Side Overlap: These settings determine the amount of overlap between the photos your drone will take. By default, they are both set to 70%. This is the optimal setting for most Missions.
- Angle b/w Images: Applicable only to the orbit mission type. This allows you to configure the overlap between photos your drone will take, specific to the orbit flight. Setting this to a higher number of degrees will capture less photos and be a quicker flight because there is a bigger gap between each photo. And vice versa, if you want a higher quality capture with more images, set to a lower number of degrees.
- Remaining Estimates: You cannot set this parameter directly. Mapware Fly automatically calculates the amount of time it will take your drone to complete the flight, how much area will be covered, how many images will be captured, and the approximate number of batteries. NOTE: The number of batteries is a conservative estimate assuming good battery health and charge.
2D Orthomosaic
An orthomosaic map is a distortion-free representation of an area that’s true to actual geography, and can be used to measure accurate distances between points. These maps have a number of use cases in a variety of industries, like real estate, law enforcement, agriculture, construction, and environmental conservation.
To create an orthomosaic map, a series of 2D images are “stitched” together into a composite image, using overlapping areas of the images as reference points.
Here are some best practices to capture the best images in Mapware Fly, to be used for orthomosaics:
- Mission Type: A normal grid pattern will do just fine for this use case. Corridor can also be used if you are looking to map a linear landspace.
- Altitude: This should be set on the lower side, we'd recommend around 200-250ft. Keep in mind a lower altitude will take longer to fly, but you will have increased map resolution so you may have to make a compromise depending on your goals. If you are looking for a super quick flight that will provide an orthomosaic as soon as possible, then set this to 400ft. Make sure to use Terrain Following or you may have image quality issues if there is variable landscape where you are imaging.
- Airspeed: The slower you set the drone, the more likely the images will not have any issues with blurring or the potential to miss any image captures due to environmental interference (such as wind). We recommend a maximum of 10mph for Mavic 2 Pro and Phantom 4 and 4mph for Mini 2 and Air 2. However, feel free to experiment with your own setup and landscape, as you may be able to find a more ideal combination for your project.
- Camera Angle: This should be set to NADIR or -90, facing the camera straight down at the ground.
- Overlaps: As a rule of thumb, plan for at least 70% for side and front image overlap. However, consider the level of detail required for your project. In some case, 80% or 90% overlap is needed if you are looking for high quality orthomosaic maps, whereas other times you can get away with 60% if you are just looking to have a semi-accurate quick flight to get a map as quickly as possible (such as for first responders).
Don't forget: You can upload the images captured in Mapware Fly directly to Mapware to quickly and accurately generate 2D Orthomosaic and 3D photogrammetry maps.
3D Photogrammetry
Photogrammetry creates 3D digital models of physical environments—”digital twins”—to help us better understand the world around us. With this powerful visualization capability in your toolkit, you can save costs, reduce risk, make better decisions, and much more. Using a camera on a drone, or unmanned aerial vehicle (UAV), a set of serial images is collected that can be stitched together into a digital twin that gives project planners a detailed, bird’s-eye view of the area.
It can be difficult to gain a comprehensive view of large areas from the ground. Using aerial photos and photogrammetry software to stitch them together paints a complete picture of the environment. These environments may be construction sites, agricultural fields, animal habitats, pipelines and processing facilities, towers, roads, bridges—any physical space can benefit from remote sensing.
.jpg?width=418&name=completed%20model%20in%20mapware%20(2).jpg)
Here are some best practices to capture the best images in Mapware Fly, to be used for 3D Photogrammetry:
- Mission Type: Ideally you would use double grid (or a crosshatch pattern) in order to capture as much information as possible in the images, however a normal grid pattern will also suffice in most cases. Corridor pattern can also be effective if you are looking to map a linear feature or landscape (such as a canal).
- Altitude: This should be set on the lower side, we'd recommend around 200-250ft. Keep in mind a lower altitude will take longer to fly, but you will have increased map resolution so you may have to make a compromise depending on your goals. Make sure to use Terrain Following or you may have image quality issues if there is variable landscape where you are imaging.
- Airspeed: The slower you set the drone, the more likely the images will not have any issues with blurring or the potential to miss any image captures due to environmental interference (such as wind). We recommend a maximum of 10mph for Mavic 2 Pro and Phantom 4 and 4mph for Mini 2 and Air 2. However, feel free to experiment with your own setup and landscape, as you may be able to find a more ideal combination for your project.
- Camera Angle: We recommend between -60 to -70 degree pitch angle for the camera to capture the best images to be used in photogrammetry. If you are looking for a specific number, -70 would be a good place to start.
- Overlaps: As a rule of thumb, plan for at least 70% for side and front image overlap to prevent undersampling. However, consider the level of detail required for your project. In some case, 80% or 90% overlap is needed if you are looking for high quality orthomosaic maps, whereas other times you can get away with 60% if you are just looking to have a semi-accurate quick flight to get a map as quickly as possible (such as for first responders).
Don't forget: You can upload the images captured in Mapware Fly directly to Mapware to quickly and accurately generate 2D Orthomosaic and 3D photogrammetry maps.
For more detailed information on best practices for capturing images used in photogrammetry, check out our detailed best practices document.